Saturday, 17 December 2011

The Thread Organiser

For mums Christmas present I made her a thread organizer. I used a small cross stitch pattern I had done in an afternoon/evening. The cover is leather as is the scissor holder which I made to fit stork scissors.

Front cover
 
The cross stitch pattern is from Joan Elliot's Bewitching cross stitch. The rest of the design I made up as I went along. The closure is Velcro and the whole thing is stitched around the edge.

Inside the organizer
  The Inside has a scissor holder and pin/needle holder plus replaceable thread organizing cards. The pin holder is close cell foam covered with the calico lining, there is a thin card board layer between the lining and outside leather. The cards are folded around wires.

Cross Stiched Foot Stool

Last year I made my mum a cross stitched foot stool. the cushion on the top was cross stitched and my husband made the stool which did not turn out the way he wanted it to and he is going to remake it..... eventually. I havn't included any photos of the stool its self just the cushion.

The pattern is a combination of a boarder i found in a book and a pattern off of the internet at www.crosstitch.com

Finished cushion

Close up of chekins

Close up of boarder

I don't remember how long it took me but I think it was a couple of months. The design is on buff 18 count adia.

Wood Working

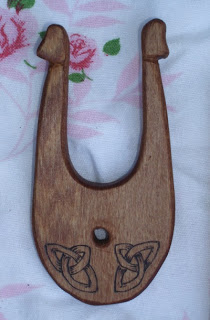
I have also dabbled in a little wood work this last couple of months. I made 4 lucets, a medieval tool for making cord, If you are familiar with making rats tails where you use 4 prongs to make a hollow cord. This is the same thing except with two prongs.

Here are the four lucets two of which are the same. The swan I did two of  I also have a design for a dog and a dragon that I haven't yet finished


.
These two photos show the swan heads. this is where you work your thread
in a figure of  eight type pattern in to a cord which you thread through the hole in the bowl of the tool.


The wood I used for the lucets is rimu. I used a pyrography tool to add more detail to the carved heads and finished the tools with danish oil.
Close up of the Horse heads


Whole tool
 I will post photos of the Dragon and dog heads as I finish them.

Close up of the pyrography on the bowl of the tool

Whole tool
These tools fit neatly in the palm of the hand and are turned as you work the thread around to create a cord.

Cross stich bags

I have made 2 cross stitch bags for Christmas presents this year, one for my grand ma and one for my mother in law. I did the cross stiches and then made them into front pockets for the bags i made to go with them.


The peacock bag is the second one I made, the pattern is from Lesley Teare's Oriental cross stitch. The cross stitch it's self took me about 2 months and the bag took about 3 hours to complete I used plain  coloured cotton for the outside and cream calico for the inside and handles.

The peacock half finished

The peacock finished
Peacock bag


close up of finished product

The First one I completed was the Willow pattern Bag the pattern was taken from a book called blue and white cross stitch, I don't remember the author. I borrowed the book from the library. The materials for the bag are the same as above except I used white cotton lining for the lining and handles. The cross stitch took 1 month and the bag about 4 hours as I was working out the design.

Willow pattern bag
Close up of the cross stitch

A Month of Books


I have completed 3 books and 2 small photo albums in the last month all of which were for sale at a recent market.

My helper (sewing frame for sewing books)


The 3 books were 2 small note books about A6 size and one slightly larger than A5

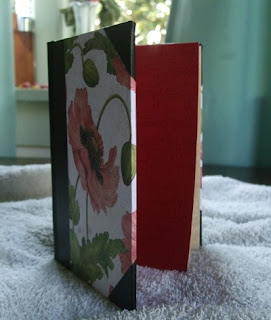
Front cover

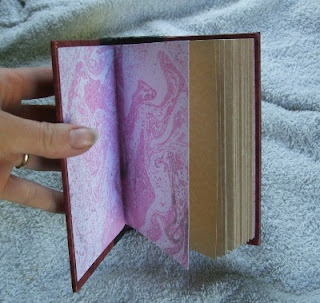
A look inside
The paper on the covers is scrap booking paper and black buckram the pages cream parchment paper with red patterned end papers. This one is A6 size.

Front cover

A look inside
This book is sewn onto tapes and the covers laced in. Tight back leather spine and fancy synthetic book paper on the cover and hand marbled end papers from an experiment I did with marbling. The pages and size are the same as the above book.

Front cover

Inside the book
This book is slightly bigger than A5, I used scrap booking paper on the cover again along with green book cloth. The end papers are hinged on the same book cloth and have left over parchment paper from the 2 small books on the endpapers. The pages are varied thicknesses of trade aid paper.

The two small photo albums

Front cover

A peek inside
This photo album is sizes to fit 6x4 photos one to a page. I have used scrap booking paper again and synthetic book material for the hinged covers. I used Japanese sewing style to bind it. 

Front cover

 
A peek inside
This one is the same size as above and uses the same materials and techniques except for colours and the sewing style is slightly more complicated.

The books were trimmed with my new book plough that my husband made for me and works a treat, Thanks Hun. :)

none of these books sold at the market. 

a month and a half

Its been a month and a half since my last post and I have done several projects in that time. It is also a week to Christmas and I'm knackered. The veggie garden is less than successful which is a shame, something keeps eating the carrots before they have a chance to grow properly and the cats keep digging up the seedlings. Any way the projects.............